It's finally here!!! The Eastern Palace Bundles are available for purchase.
Click here to view the flyer with full details

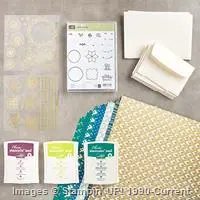
The starter bundle includes the Eastern Beauty stamp set, Eastern Palace Specialty Designer Paper, Eastern Gold Vinyl Stickers, 3 new In Colors (Fresh Fig, Lemon Lime Twist and Tranquil Tide) and FREE Very Vanilla Note Cards & Envelopes — all of this for only $60.50

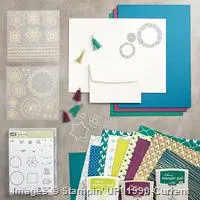
The premiere bundle includes the Eastern Beauty stamp set, Eastern Palace Specialty Designer Paper, Eastern Palace Cardstock Pack (includes two of the new In Colors), Mini Tassels Assortment, Eastern Gold Vinyl Stickers, 3 new In Colors (Fresh Fig, Lemon Lime Twist and Tranquil Tide), Eastern Medallion Thinlits (love these) and FREE Very Vanilla Envlelopes & NEW Thick Very Vanilla Cardstock — all of this for only $103.50
When you order either bundle I have a PDF file to email to you with instructions for 3 fabulous cards to make using your bundle.
I was playing with my premiere bundle yesterday and I know you are going to love it.
I saw a card on Pinterest by Rosanne Mulhern that I knew I had to make. I changed just a teeny, tiny bit because her card was awesome. This card doesn't use the bundle as you would expect. Check out this fun card.

Don't you just love it — a sunflower made from the Eastern Medallion.
I told you this is a must have.
I cut out two of the sunflower looking medallions — attached them with dimensionals.
I cut out an Early Espresso scallop circle and embossed it with the Softly Falling embossing folder. The frame is made with the Layering Squares and Stitched Shapes framelits.
The words are stamped inside the frame with Early Espresso.
The bees are from Gardens in Bloom — I stamped and cut them out with my Paper Snips — yes, they are fussy cut but it wasn't bad at all. Of course they are attached with dimensionals.
Now look at the inside:

ADORABLE!!!
Thank you Rosanne for the inspiration — this was a fun card.
Remember — you can order either bundle, just click the link below.
Once I have the online notification, I will email you the PDF file for the cards.