Daisy Delight Treat

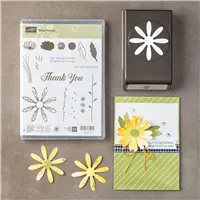
Last night I held my Suite Surprise class which featured the Daisy Delight Suite.  I love this suite and I think everyone at the class loves it too.  My Suite Surprise classes include a surprise treat.  This month’s was a fun one to make.  I saw this great treat holder close to a year ago — Erica Cerwin featured it and I have wanted to try it out for a long time.  I finally did it and it so much fun to make and the ladies all loved it.  Of course I put chocolate inside — couldn’t find coordinating colors but who can complain, it’s chocolate, right!!!

Daisy Delight stamp set, Daisy Punch, Delightful Daisy Designer Paper, Pretty Label Punch, Label Me Pretty stamp set, Treat Holder
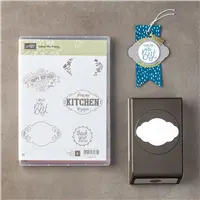
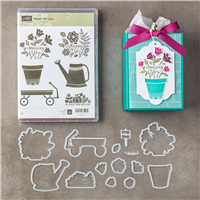
Isn’t it adorable!!!  I used the Delightful Daisy designer paper with Old Olive cardstock.  The Pretty Label punch and Label Me Pretty stamp helped add a little greeting to the top.

Daisy Delight stamp set, Daisy Punch, Delightful Daisy designer paper, Label Me Pretty stamp set, Pretty Label Punch
Inside I added little “ketchup” cups with lids and M & M’s because who doesn’t like M & M’s right!!!

Treat Holder, Daisy Delight Stamp Set, Daisy Punch, Delightful Daisy designer paper
If I get brave enough I may try to do a video to show you how fun and easy these are to make — let me know if you might be interested in this.

SUPPLIES USED:


Share this!

Hello Friend

When I was on the Thailand Incentive Trip I signed up for a card swap.  This means I had to design and make 26 of one card and then I came home with 25 different cards — Stampin’ Up! kept one card — they set up lots of displays and use these cards for those displays.  This is one of the cards that I received, the designer was Jessica Hill.

Florall Statement stamp set, Jar of Love stamp set, Decorative Ribbon Border Punch
Measurements:
Crumb Cake — 5 1/2″ x 8 1/2″ — scored at 4 1/4″
Crumb Cake —  5 1/4″ x 3 3/4″
Powder Pink —  1 x 5 1/4″ — punch with Decorative Border Punch
Crumb Cake — 3/4″ x 2″ — punch with Triple Banner Punch or cut wth scissors
Linen Thread — 10″

Stamp the image with Archival Black ink
Color with Blender Pen and ink pads (Powder Pin, Calypso Coral, Old Olive)

Floral Statement, Blender Pen, Ink Pads
Here’s a closeup of the flower pieces

This card is so elegant — I love it!!

SUPPLIES USED:


Share this!

Grown with Love

Here’s the final card we did at my Embossing Paste class.  My sister, Tina, did this card with her ladies and I fell in love with this card as soon as I saw it.  The Berry Burst colors with the Soft Suede just pop.  This card is so stunning but very easy to do.


Grown with Love stamp set, Garden Grown Framelit, Embossing Paste, Pattern Party Decorative Marsks


We started with a piece of wax paper — put a scoop of Embossing Paste on it — added two drops of Sahara Sand Reinker and mixed it together giving you a look of concrete bricks.  Then lay the Pattern Party Decorative Mask (brick) over the Soft Suede cardstock and with a Palette Knife wipe the paste over the mask — it’s ok if you don’t fill in every brick, leave some blank, and some bricks aren’t filled completely.  The end result is beautiful.  Let the brick dry while you stamp the other pieces.

* Stamp watering can with Berry Burst ink.
* Ink the flowers with markers — Berry Burst, Pear Pizzazz and Soft Suede
* Cut both pieces out using the Garden Grown Framelits
* Tie a bow in 5/8″ Crinkled Seam Binding – Berry Burst — wrap around bottom of Soft Suede cardstock

Measurements:
Thick Whisper White – 4 1/4″ x 11″ – score at 5 1/2″
Berry Burst — 4″ x 5 1/4″
Sahara Sand — 3 3/4″ x 5″
Soft Suede — 3 1/2″ x 4 3/4″
Berry Burst 5/8″ Crinkled Seam Binding — 12″
White White — 4 1/4″ x 5 1/2″ for stamp watering can & flowers

Supplies Needed:

Share this!