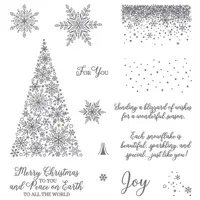
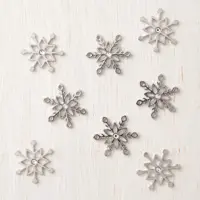
Spooky Sweets Treat Holder

Tomorrow is October 1st — how does time fly by so quickly!!!  But October 1st means Halloween is sneaking up on us and will be here before we know it.  Have you been planning those Halloween projects?  I love to make treat holders and Halloween colors are so much fun.  Today is a fun treat holder that is pretty quick to make and could hold a variety of treats.

I found this adorable little treat box that Karen Robinson made when I was googling the stamp set, I knew it was perfect for me.  I adjusted the size to fit a little candy treat — perfect for the little Kit Kat candy bars — the single ones — not fun size.


Halloween Treats, Spooky Sweets Bundle

Measurements:
*  My treat box is 4 3/4″ long x 1″ wide x 3/4″ thick.
*  Pumpkin Pie cardstock – 4″ x 5 1/2″ – stamp misty splotches with Memento ink
*  With the 4″ side at the top of the Simply Score Tool, score at 1/2″, 1 1/4″, 2 1/4″, 3″
*  Turn so 5 1/2″ is at the top — score at 3/4″
*  Cut the tabs up to the 3/4″ score line
*  Fold on all score lines
*  Put Tear & Tape on 1/2″ flap — fold to create box
*  Mini Glue Dots on the 3/4″ flaps — fold to close one end of box.
*  On the opposite end, pinch box closed — punch hole to put ribbon through
*  Cut 6″ of Black 5/8″ Glittered Organdy Ribbon — thread through hole and tie
*  Scrap of Whisper White cardstock, stamp bats with Memento ink — punch out with Spooky Bat Punch
*  Stamp moon with Crushed Curry — fussy cut with Paper Snips or punch out with Twinkle Builder Punch
*  Stamp “no tricks just treats” with Memento — cut out using the Bottles & Bubbles Framelits
*  Attach all with Mini Dimensionals
*  Fill treat box with little candy, lip gloss, chapstick, etc.

Supplies Used:


Share this!

Country Lane Suite Framed Art

When I ask customers if they’ve been stamping outside of our classes, many respond that they aren’t creative.  I always respond that we are all creative in our own way but when you need a little help getting started we all CASE projects — case = copy and share everything.  That’s right, take a project you’ve already made and make it again but use different colors, different paper, even a different stamp set and see what a difference it makes.

Today’s project is exactly that — a CASED project.  A couple of weeks ago I shared a project we did at our Stampin’ Sisters Holiday Hoopla.  It was a framed art piece featuring the Country Home stamp set in a farmhouse style – soft and subtle was the theme here.

Country Home Stamp Set, Festive Farmhouse Designer Paper, Galvanized Metallic Paper, Tin Tile Embossing Folder


At my Country Lane Suite class we were making a framed art project.  I didn’t want to copy this project as some guests were at both events, however I love the layout of this frame, so I CASED it.  I changed all of the colors and designer paper but I kept the Country Home stamp set, Galvanized Metallic Paper, Chicken Wire, Clips and Buttons.  It ended in a project that looks the same yet completely different.  Everyone loved the colors in this project (I kept it out of the frame so I could take a picture without the glare from the glass).

Country Lane Suite, Country Home Stamp Set, Country Lane Designer Paper, Galvanized Metallic Paper, Chicken Wire


I think it turned out great, I can’t wait to hang it up.  How would you like to make this project yourself?
You can — just place an order of $50 and I’ll mail you a kit with all the pieces and pictures of the panels up close.
You will need to provide the Country Home Stamp Set, Memento Ink, Blackberry Bliss stamp pad and Stampin’ Blend Markers — Light & Dark Smoky Slate, Light & Dark Old Olive, Light & Dark Blackberry Bliss, Light & Dark Soft Suede and the shadow box frame (8″ x 10″).

Supplies Used:

Price: $6.00

Price: $9.00

Price: $5.25

Share this!

Country Lane Tin Tile Card

I hope you enjoyed yesterday’s Country Lane Suite cards.  I have one more card to share and then I want to show you the framed art we did.

Here’s the third card everyone made at class.  I saw this layout online (I tried to find it again to give credit but can’t find it — sorry).  The designer paper is the main feature on the card plus the fun little tin tile stamp down the right side.


Country Lane Suite, Country Home Stamp Set, Country Lane Designer Paper
The card base is Mint Macaron with Early Espresso and one of the gorgeous Country Lane designer papers.  The inside of the card has a piece of Whisper White cardstock that I stamped the tiles with Soft Suede ink.  I add the Happy Harvest Blessings to the center of the card.  I can’t wait to send this card out.


Supplies Used:

Share this!